CRUD Operations With Element Widgets
CRUD - Create, Read, Update and Delete - are one of the most common operations you will often carry out while use XRipe Website Builder to build and maintain your website. These operations repeat across almost all the element widgets.
On the constructor page, element widgets can be manipulated and styled by right-clicking the Element handle and selecting necessary action from the context menu that pops up. Some actions will trigger additional window to pop-up in the sidebar panel, while others will change the state of the mouse cursor from default pointer (typically an arrow.) to a Move pointer (indicating something to be moved), often with green thick horizontal line. The move pointer looks like a cross with four arrows around it. The arrows show that you can move an entire object either up, down, or side to side.
| Element handles |  |
|||
| move pointer with green thick horizontal line | ||||
Below is a list of common operations that can be carried our with XRipe Website Builder elements
Manipulating Element Widgets
| Create (Add) | There three different ways you can Create or Add new Element:
|
|---|---|
| Read | Right-click the element handle and choose Edit from the context menu, if you want to read the element's content, style and other properties. You can also edit the data in the resulting window in the sidebar panel. |
| Update (Save) |
 By default, the menu items are not visible, they are collapsed behind the hamburger button. Click the button to display them on the screen. Publish - click to save and to publish your website. Save as draft - click to save changes temporarily. Close - click to exit the Constructor page and return to the Dashboard |
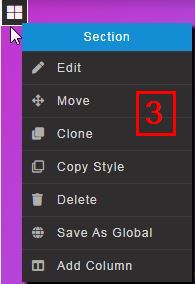
| Delete | Right-click the element handle and click Delete from the context menu - pic.3 |
Other Operations with Elements
Apart from CRUD (create, read, update, delete) operations, most Element widgets support advanced features such as editing the properties, saving some part(s) of the web page as Template(s) into the Global Element library and re-using the saved template(s) across multiple web pages. Another feature is to copy a section style without content (as opposite cloning) and later use the style elsewhere on the page. To carry out these operations you only need to invoke the context menu of the element by right-clicking on it's handle.
| Edit |
|
|---|---|
| Move | To Move an element from one position to another:
|
| Clone | Clone duplicates an element with all it's content and properties and then insert the copy immediately after the original element. If necessary, you can use Move to drag drop the new element into another position. |
| Copy Style | Copy and paste only the style (without the content) from one section to another. See also: Styling And Formatting |
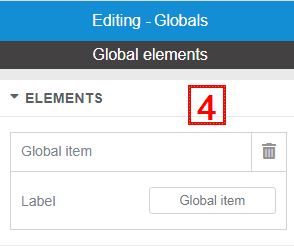
| Save As Global | Save As Global - saving some part(s) of the web page as Template(s) into the Global Element library and re-using the saved template(s) across multiple web pages. Examples: Navigation Menu, Header and Footer sections, Social Buttons or any other section(s). There is no limit to the number of global elements you can save to the repository.
|
| Globals | All saved custom elements or templates can be re-used across all pages (including the current one) of your website project. Typical example:
|
| Add Column | The operation adds a new column below the current (selected) section - pic.3. This can also be achieved by selecting Column Element widget from the sidebar panel (pic.1) and inserting it into the necessary position on the web page. |

