Block (Section) Widget
Block or Section Widget
In XRipe Block or Section is the foundation on which all other widgets are made functional, that is Block or Section occupies the highest hierarchy in XRipe Website Builder's collection of widgets.. Section invokes section tag for insertion into the Central Workplace. Section or Block acts as container and is used to group together elements - for example, one or more heading elements and additional elements presenting related contents such as column, text, image, etc. In fact, anything.
You drag and drop almost all other widget elements into various Sections. Without having at least a Section, this will be impossible. It's important to bear this in mind, most especially if you have decided to start building your website with a blank page instead of using one of the pre-designed templates. In such a case, first and foremost thing you do is to drag-drop a Section element (Block widget) onto the page and then any other widgets may follow.
Typically, a web page will consist of at least three Sectional areas: the header, the main body and the footer parts. Further, header section may contain elements such as menu with vital links , company logo image, telephones etc., body part may contain company introduction, products or services, call to action etc. Footer part is where you have full navigational links to all other pages (if any), copyright notice etc.
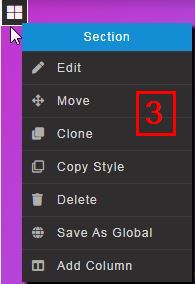
Section handle is located top left corner of the element borders and designated by icon: ![]()
To create a new Block or Section do the following:
- Click on the Block widget icon (first item on the core widget list )
- Drag the widget to the central Workspace (your web page)
You should notice your default pointer (typically an arrow.) has changed to a Move pointer (indicating something to be moved) along with green thick horizontal line. The Move pointer looks like a cross with four arrows around it. The arrows show that you can move an entire object either up, down, or side to side.
- Locate the place to drop the widget
- Left-click on the Move cursor to drop the widget.
- If necessary, drag and drop other Element Widgets into the Section Element area.
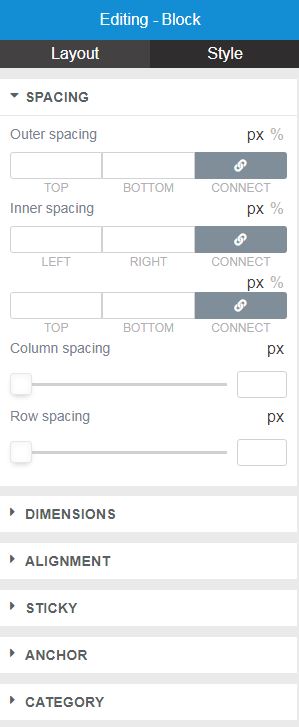
Editing Section Element Properties
| Add/Delete |
|
|---|---|
| SEO |
|
| Notes: URL - Uniform Resource Locator, colloquially termed a web address. If the address is located on same website, you should enter only the link to the page without full URL, that means the URL is relative. For example, home, contactus etc. If the address is located on an external website, meaning the URL is absolute, then you must indicate the address full URL, For example, https: //anothersite.com/home, https://anothersite.com/contactus respectively. Auto-generated menu - each time you add a page with a link, the page along with the link is automatically added to navigation menu and, by default, visible/accessible to visitors. There are situations where you do not want the link to be automatically added as navigation menu item, in such a case you indicate Hidden. Page Title, Description and Keywords - belong to meta tags that define metadata about an HTML document. Metadata is data (information) about data. Meta tags always go inside the head section of a web page, and are typically used to specify character set, page description, keywords, author of the document, and viewport settings. Metadata will not be displayed on the page, but is machine parsable. Metadata is used by browsers (how to display content or reload page), search engines (keywords), and other web services. Meta Title - keep the title length to 65 characters including spaces for best possible rendering. You can go up to 70 characters in total, but try not to exceed this. Meta Descriptions can be any length, but search engines generally truncates snippets to ~155–160 characters. It's best to keep meta descriptions long enough that they're sufficiently descriptive, so we recommend descriptions between 50–160 characters. Meta Keywords - helps to tell search engines what the topic of the page is. There is no limit of meta keywords. |
|


